The Anatomy of Photorealism: Engineering the Perfect Prompt.
The Physics of Realism
To move beyond the ‘plastic’ AI look and master The Anatomy of Photorealism, you must stop describing the subject and start describing the physics of the shot. Realism isn’t about what you see; it’s about how the light hits the texture.
1. The Lighting: Beyond “Bright”
In a professional studio, light has direction and temperature. To get that Becomine look, use Golden Hour or Volumetric Side-Lighting. This creates long, soft shadows that define the object’s shape and reveal its microscopic depth.
- Pro-Tip: Don’t just say “lighting.” Say: “Soft directional light through a window, casting cinematic shadows.”

2. The Camera: The 100mm Macro Rule
Standard AI prompts use a wide lens that makes everything look fake. For true Documentary Realism, simulate a 100mm Macro Lens. This creates an Ultra-Shallow Depth of Field, where only a tiny part of the object is in focus.
- The Result: It makes the viewer feel like they are looking at a real, physical prototype on a design firm’s table.
3. The Texture: Embracing Imperfection
The biggest giveaway of AI is “perfection.” Real things have grit. You must prompt for visible micro-ridges (like 3D-print layers), porous stone textures, or organic veins.
- The Secret: Add keywords like “natural imperfections,” “tiny chips,” or “raw specimen” to break the digital smoothness.
4. The “Blueprint” Prompt Structure
Follow this formula for every generation:
[Subject] + [Material Texture] + [Macro Camera Settings] + [Atmospheric Lighting] + “Not CGI”
5. The Macro Archive: Raw Specimen Realism
Follow this formula for every generation to master The Anatomy of Photorealism. Here is the breakdown of your prompt’s ‘DNA.’ To move beyond a basic table, I’ve organized this as a Technical Blueprint.
The Element Breakdown
| Category | Technical Specifications |
| Texture & Surface | Aged Topography: Crusty green verdigris, deep pitting, splintered sun-bleached wood grain, chalky oxidation, and dry, rough fiber. |
| The “Flaw” Layer | Organic Imperfections: Spiderwebs, deep scratches, rainwater staining, and uneven patina. Strictly no digital smoothing. |
| Lighting Logic | Ambient/Direct Contrast: Soft blue-tinted alleyway light (diffuse reflection) pierced by a single sliver of high-intensity direct sun to highlight physical depth. |
| Camera Optics | Macro Specimen: 100mm Macro lens, shallow depth of field (DoF), critical focus on the patina topography, documentary journal style. |
| Color Science | Cinematic Realism: True-to-life color science, high contrast, unretouched raw “documentary” finish. |
Here is the full Prompt :
"Photorealistic detail with visible aged textures including the crusty green verdigris patina, deep pitting in the metal, and the raised, splintered grain of the sun-bleached wood. Natural imperfections including a tiny spiderweb in the corner of the hinge, a deep scratch from years of use, and uneven staining from rainwater. Realistic surface variation with the chalky feel of oxidation versus the dry, rough wood. No digital smoothing.

Surrounding anatomy shows authentic depth with visible wood knots and the heavy iron nails driven into the frame. Real light behavior (diffuse reflection) off the powdery copper surface.

Lighting is the soft, blue-tinted ambient light of a narrow alleyway, with a single sliver of direct sun hitting the metal to reveal the crusty topography. True-to-life color science, cinematic contrast. Shallow depth of field with critical focus on the green patina.

Shot on a 100mm macro lens. Feels like a real documentary photograph from a travel journal. Documentary realism, unretouched, raw and authentic. Not CGI.
 ChatGPT
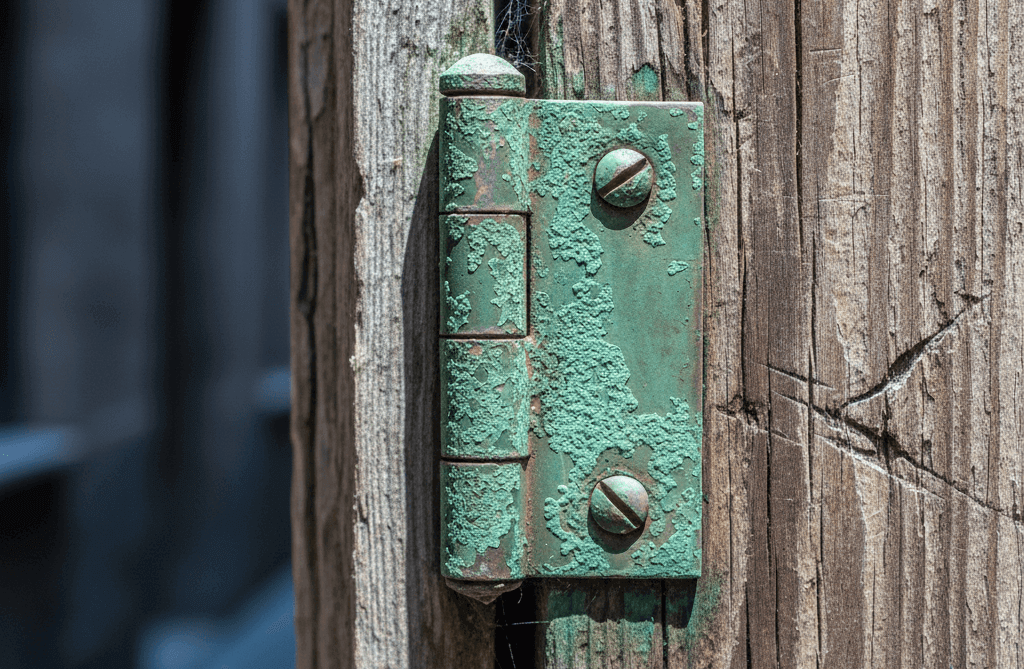 Nano Banana
6. The Prompt Engineering Protocol: Dos and Don’ts
DO (The Smart Choice)
- Use tactile, gritty descriptors like “crusty verdigris,” “splintered grain,” or “porous stone.”
- Specify camera physics: “100mm macro lens,” “shallow depth of field,” or “f/2.8 aperture.”
- Describe the source and behavior: “Side-lighting through a window,” or “diffuse blue-tinted ambient light.”
- Incorporate “Documentary Realism” via flaws: “spiderwebs,” “rainwater stains,” or “deep scratches.”
- Add a negative constraint to the engine: “Not CGI,” “unretouched,” or “raw specimen photo.”
DON’T (The Amateur Mistake)
- Use generic, smooth words like “highly detailed,” “sharp,” or “smooth surface.”
- Use vague quality buzzwords like “4k,” “8k,” “HD,” or “hyperrealistic.”
- Use flat, artificial lighting terms like “bright light,” “studio lighting,” or “neon glow.”
- Aim for “Digital Perfection” with clean lines, perfect symmetry, and zero surface noise.
- Leave it open-ended, which often defaults the AI to a plastic, “over-rendered” Pixar look.
The Becomine Verdict
The Anatomy of Photorealism is a science of details. By engineering your prompts with the precision of a documentary photographer, you unlock a level of realism that sets your work apart in a crowded digital landscape.
Ready to start your next build? Take these protocols to Nano Banana or ChatGPT and see the difference that technical precision makes.
Mastered The Anatomy of Photorealism? Now scale. One tool is a blueprint; a toolkit is a system. Access our AI Tools vault for surgically-vetted guides. Architect your automation today.